


5.31.2011
**Giveaway Reminder**
Don't forget my giveaway ends 11:59 pm TOMORROW! You can enter by clicking the pic in the top right corner of my blog. I will be traveling tomorrow, but I hope to sort through and announce the winner by the weekend. Thanks for entering! :)


5.29.2011
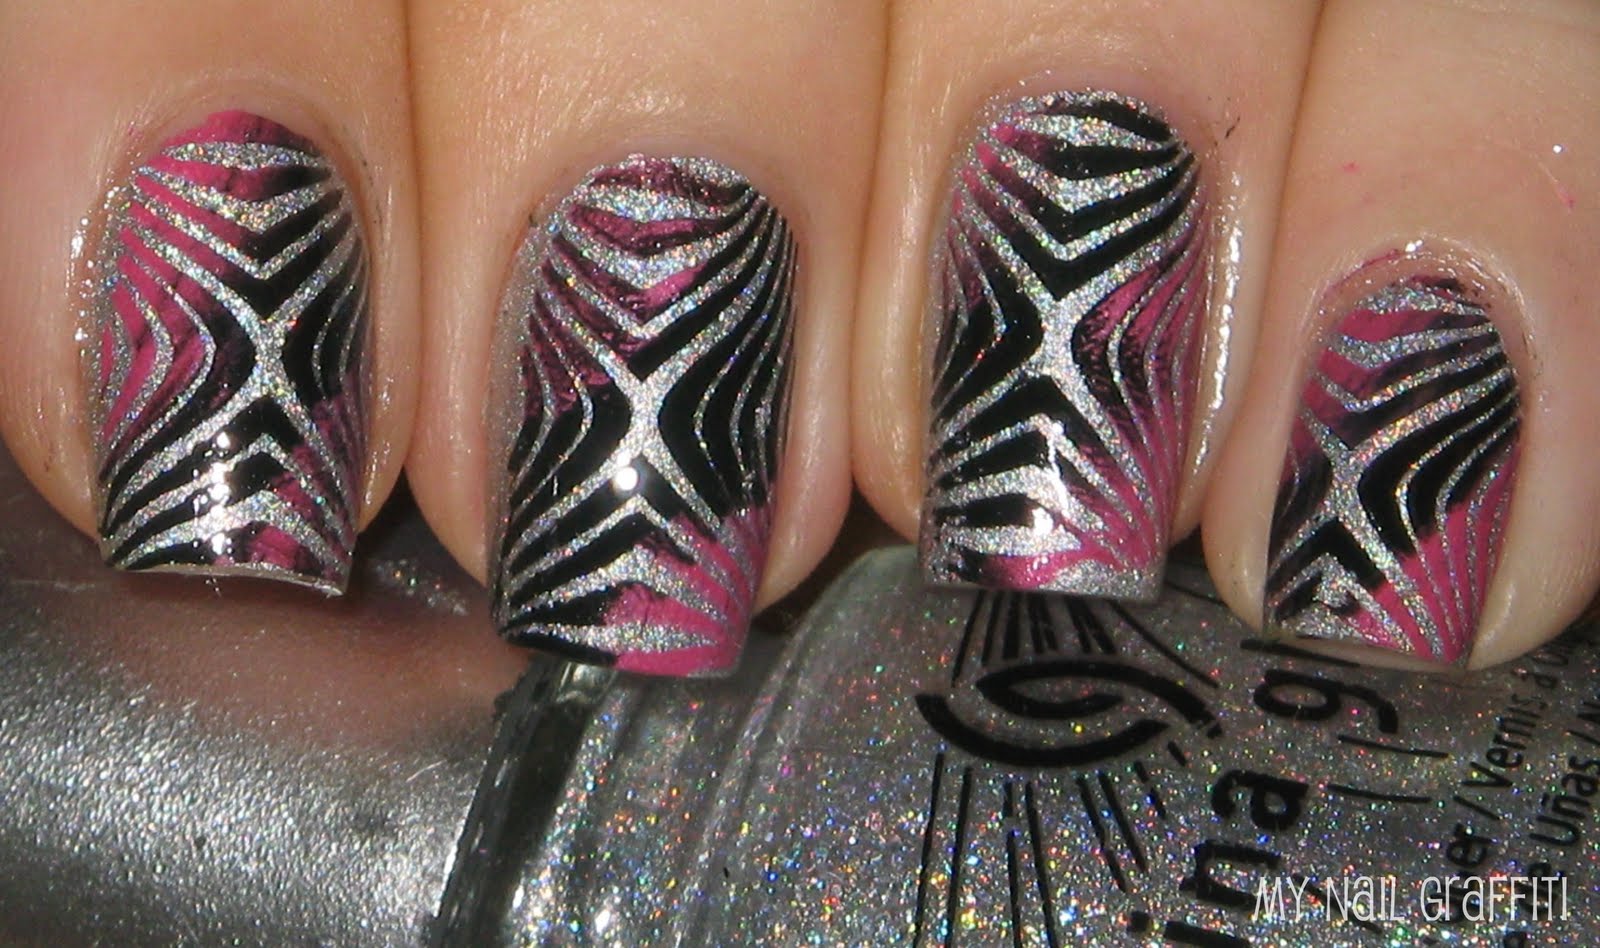
China Glaze Sexagon + Mini Tutorial
Hi lovelies! I am trying to stay resilient through this mono by keeping up with my nails...it lifts my spirits a little bit. :)
Dustin found Sexagon from China Glaze's Kaleidoscope collection on Ebay. It was used, but it showed up in the mail barely used! Moral of the story: Give used polishes a chance! :)

This polish was good in 5 coats because the formula is SUPER thin. Dustin had the idea to layer it over Color Club Worth the Risque in order to save this precious polish, and I don't think it affected the overall appearance of Sexagon. (I had done one hand with just Sexagon to compare.)
Dustin calls this the "psychedelic" stamp design. It's Bundle Monster plate M221 stamped with Konad Black and Pink. I am including some pics at the end of this post on how to stamp with multiple colors at a time.


So Dustin thought this was a self explanatory thing, but I know there are lots of newbies out there so I figured why not? Here is how to stamp with multiple colors at once:
Put dots of stamping polish on your design. Place the dots in the general area that you want the scraper to place each color when you actually scrape the polish across the image.

This is what you'll get:

As always, you have to be quick with stamping polishes since they dry really fast. This is just an example of how you could place the different colors on a stamp. Be creative! :)

I hope this helps someone out there and it wasn't too mundane!
I mentioned that I am sick and I will be going to live with my parents for a few weeks while I try to recover and so they can help with my baby. That way my husband will be able to focus on school! We are going to still prepare some things for you before we part ways though...but even so, if there's a lack of posting you know why! Until next time! <3
5.27.2011
Ombre Manicure
Hey! I am back finally... things have been crazy lately. I never really got better from being sick 2 weeks ago...I just went to the doctor today and I have MONO! ugh I really hope it doesn't affect my posting. At least I can still do nails even when I don't feel good right?!
So this mani is from last night and I really wasn't into it since I wasn't feeling too hot. This is an ombre, or gradient look. I chose to use my favorite color...although my middle finger (NOPI My Lifesaver) looks a lot more blue here. A tip if you don't have 5 different shades of a color: mix in white to lighten it up.

Thumb: Sinful Colors Rise and Shine
Index: Sinful Colors Mint Apple
Middle: Nicole by OPI My Lifesaver
Ring: Revlon Minted
Pinky: Sinful Colors White on White with a layer of Revlon Minted

We topped it off with Bundle Monster plate 208. Sorry for the overall quality of the mani...I know it's not the best!

To make up for that, here are some more baby nails for you guys!
This is Sinful Colors Rise and Shine with Nubar 2010 on top.

Then we did Zoya Charla with Zebra print...but don't worry, as soon as she got in the bath an hour later, her mani came right off!

My little polish lover. <3 (She only has a nail polish bottle for this pic!)

Hope those of you in the USA have fun Memorial Day weekend plans. Don't forget...my giveaway ends in 5 days! Click the pic in the top right of my blog to enter! <3
5.24.2011
Nail Sponging with Sinful Colors Neons
Good morning (almost afternoon)! This nail look is a fun collaboration between mine and Dustin's ideas. I have taken pics for each step of this look so maybe you can get some inspiration for yourself! :)
We started with 2 coats of Sinful Colors White on White, which is a really good, non-streaky white!

Next, Dustin layered on Sinful Colors Neon Melon on top. Layering a neon over white really helps ease the application/streakiness. Can I just say how much I love Neon Melon? It's in your face and super bright and it really brings out the dark tones in my skin. I can't wait to wear this on it's own!

This is where Dustin's art skills come in...I am sure I could master this with some practice, but when I tried to do it I muddied the colors up too much. So here is Sinful Colors Summer Peach and 24/7 sponged on top of Neon Melon. I would wear this look on it's own too because it's so fun and bright!


Finally, we chose the perfect stamp to compliment the sponging. This is Bundle Monster plate 205. I topped the mani off with Hard Candy's matte top coat.


You can purchase Sinful Colors at Walgreens, or directly from their site (but it has been down for a while now). I got the Hard Candy matte topcoat at Walmart. Thanks for reading and have a great day! <3
5.22.2011
Zoya Rica
Hey polish lovers! Today I am wearing Rica from Zoya's Sunshine Collection. I got the entire collection during the BOGO promo and haven't done a whole lot with them since. But I have fallen in love with them all over again! Maybe because I am finally seeing sunshine and warmth in my corner of the world!
Rica is a gorgeous peachy pink with TONS of golden shimmer.


I was inspired by the sunshine and gold shimmer (a recurring element in the Sunshine collection). So I used scotch tape to section off my nails and filled in the area with Orly Luxe. PERFECT combo! :)


Finally, we stamped a sun in Konad Black from Bundle Monster plate BM01.


Finally a mani to get excited about (at least for me)! :P Enjoy the rest of your Sunday everyone!
5.21.2011
Zoya Mitzi
OMG you guys! This week has been ridiculous! I feel like such a slacker for not posting more. : /
Today I am showing you Zoya Mitzi, kind of a pea green color, and one of the polishes from this summer's Mod Matte collection. This is by far the hardest one to apply of the 3! You have to be quick about it because it dries so fast and it shows all errors in application. That said, the matte effect is fun, but using a matte topcoat over a normal polish would be WAY easier!


This is a super simple stamping look compared to what we usually do and what ya'll have been used to seeing here. This is the Bundle Monster plate 224 stamped with Color Club Nothing But Truffle.


Hope you like it...I really really hope to get more interesting content for you guys up soon! Thanks for bearing with me, and don't forget to enter my giveaway which ends in about 10 days!! <3
5.18.2011
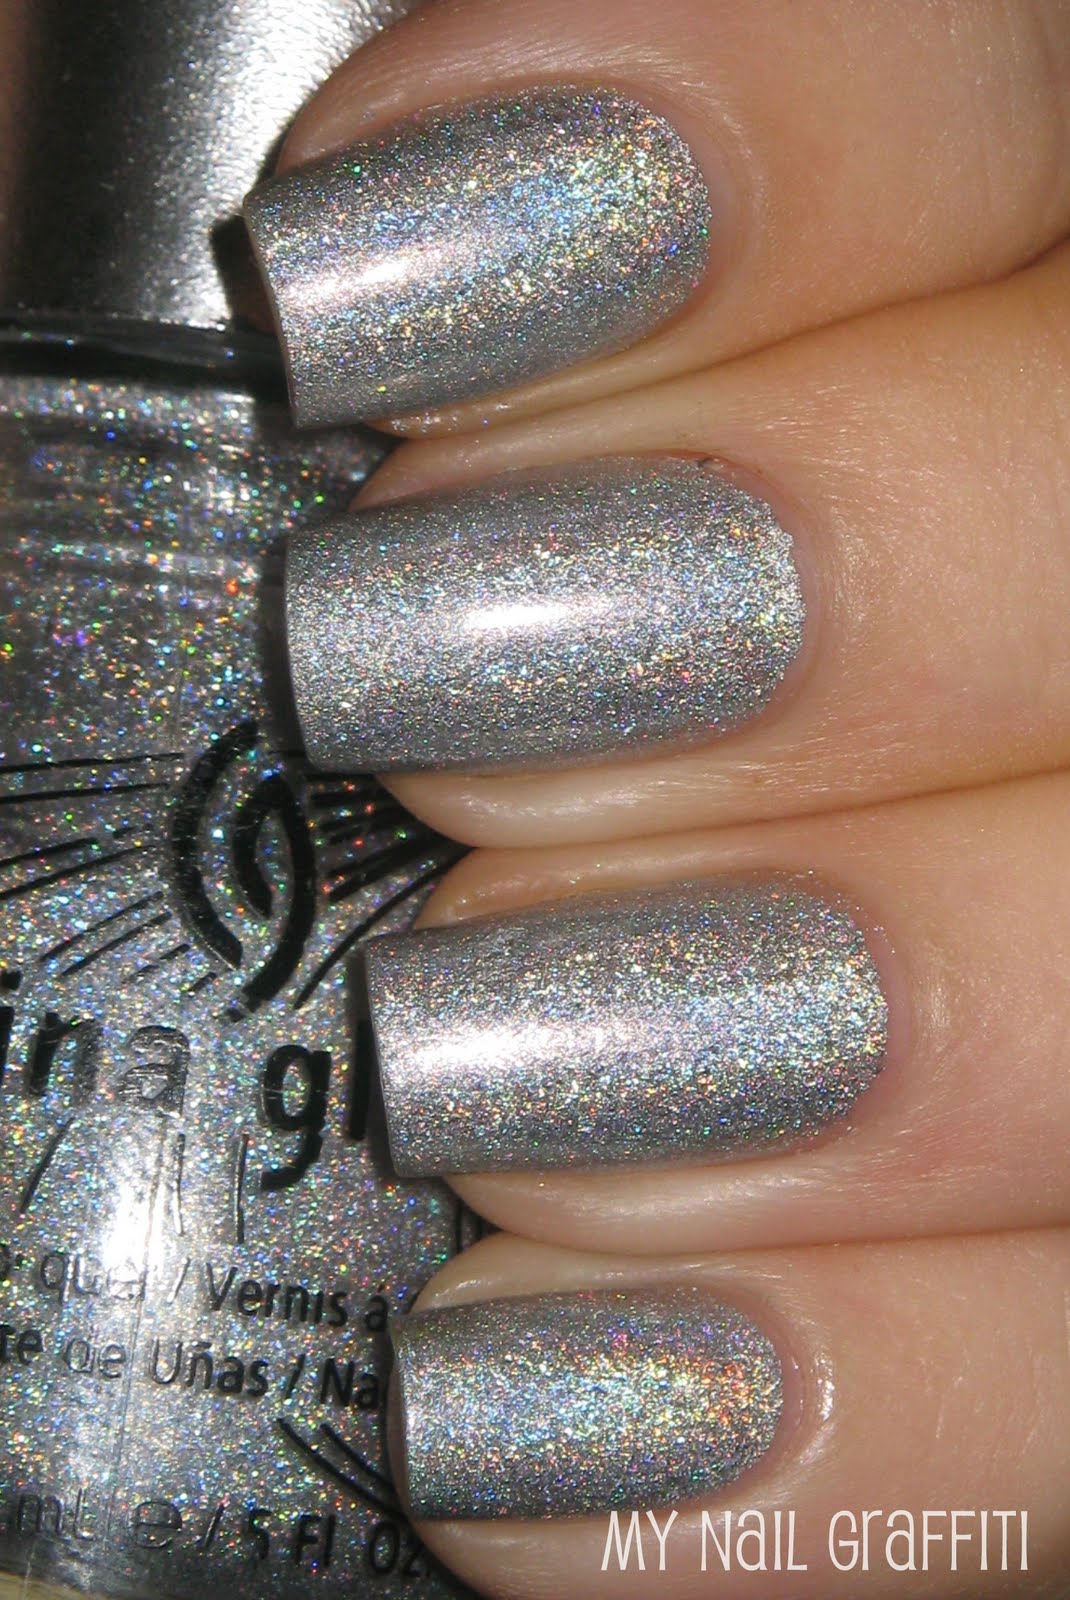
China Glaze He's Going in Circles
Hey ya'll! So in case you were wondering, no I haven't gone color blind...I know this is supposed to be Pink Wednesday! Last post I mentioned that I was sick and since then my husband AND baby have gotten sick. Needless to say these past few days have been sleepless and miserable. But I think we are past the worst of it! SO anyways...I was hoping you guys would forgive me for being MIA if I showed you some holographic goodness?... I thought so!! :)

Dustin found this polish from the Kaleidoscope collection at a good price so we picked up 2 (one is in my giveaway!!). I am so in love with this polish!

I wish I had this entire collection because it's gorgeous. I almost prefer it to the OMG collection.

You definitely don't need sunlight to see it's goodness since the holo pieces are bigger and a little more scattered.

So there you have it! If you haven't entered my giveaway, please do so YOU can have a shot at some of this amazingness too! The link is in the top right corner of this blog. I hope to be back next time with some nail art. <3
5.16.2011
Milani Silver Dazzle
Hello again polish lovers! I have been sick the past few days, thus the lack of posts. :( I am still under the weather today, but I needed to at least post something! So I am straying from nail art to show you a swatch.
This is Milani Silver Dazzle, one of their One Coat Glitters. I bought this at Kmart and fell in love when I saw it! These pics are after 3 days of wear, which is why they aren't perfect.

When I got home, I looked up swatches of the rest of the One Coat Glitters and wished I had bought them all! They are stunning!

The first thing that came to mind when I saw this was that this polish looks like fresh concrete sparkling in the sun! Tell me I'm not crazy! :P

Although this says it's a one coater, I think 2 is what this polish really is. But still, it's amazingly concentrated with glitter and coverage is amazing!
I know this next pic doesn't really do much in terms of showing the polish, but I thought it was cool anyways!! :)

Also, a reminder to enter my giveaway (Click the icon in the top right corner of my blog)! Until next time! <3
5.14.2011
Another Scotch Tape Manicure
Hey everyone! I hope you are enjoying your Saturday....I don't know about you, but I am happy it's the weekend! :)
Today is a mani Dustin and I put together using scotch tape. I hope to have a tutorial on how to use scotch tape with polish very soon!

This is a more funky look, but I think it works. I love putting together color combos...I have a weird obsession with it. haha So I'm happy with how the yellow/gray turned out.

We used Bundle Monster plate 203 and Konad plate M20 with Konad Black for stamping. Polishes used: Claire's Matte Grey and Kleancolor Pastel Yellow. The ring and thumb finger have Claire's holographic topcoat (LOVE!) and Kleancolor Holo Yellow layered on top.

Nothing too exciting, but I hope you like it! :)
Also, I caught Taylee during a nap recently so I did her toes. She woke up before I could add nail art. I can't get enough of her cute little feet! She is sporting Zoya Mira with LA Splash Sparkling Lavender on top.

Thanks for reading and if you haven't entered my giveaway yet, click the icon in the top right corner of my blog! :)
5.13.2011
Nail Foil Crackle Tutorial
Well it looks like Blogger is kinda back to normal...so I am posting yesterday's post today. I noticed my giveaway post is gone, but I know Blogger is working on restoring it. For those who have already entered my giveaway since yesterday (May 12) , I have your entries recorded.
On to the fun stuff! I have my first tutorial for ya'll today! I had some requests for tutorials as well as how to use nail foils, so we combined the two. I started with Sinful Colors Forget Now as the base. It's a berry pink with purplish glass flecks in it.

I think the name is really weird, and don't see what it has to do with a nail polish, but that's ok! :P Application was good in 2, but perfect in 3 coats.

So once you have your base color, the next 2 photos show the materials you need.
I got the foils and adhesive from Dollar Nail Art. Obviously, pretty much everything there is $1, but last I checked you have to make a $25 minimum purchase. But that just gives you an excuse to get lots of fun things! :P Besides foils they have lots of other nail art stuff.

Next, cut of a decent sized strip of foil. Brush adhesive on the paper to roughly the size of the strip you cut. Put your foil strip on top of the adhesive and once you have it all down pull it off quickly. Your paper should look like this:

Now paint your nails with the adhesive. It goes on like a milky whitish color, but dries clear. (But don't let it dry before the next step!)

Right after painting, take a sponge and dab your nails. Let the adhesive become clear, but don't wait too long or it will dry.

Cut off a nail sized strip and place it on top of your nail. Push the foil piece down onto the nail. Sometimes it helps to get a cuticle pusher to smooth it all down securely.

Immediately after it's all pushed down the way you like it, pull the strip off and you get this!

Dustin came up with this idea. He was very proud of himself! :P

It's an alternative to the crackle look that every polish company is jumping on the bandwagon with. Personally, I like this better!


*Tips and Tricks*
-Nail foils don't last long at all. I would recommend them for a special occasion, or if you do your nails daily.
- Foils last longer on toes. (For me personally)
- Use the most basic top coat you can find. It's kind of hit and miss as to which ones are compatible with foils. Some, (especially fast dry) will eat at the foils. In my experience, the cheapest, most random one I own works best.
- If you want to cover your whole nails with the foil, paint a similar color underneath, that way any foil chipping/mistakes blend in better.
- Be creative! There are so many ways to use these, but there is definitely a learning curve.
If any of you try this, I would love to see it!
Subscribe to:
Posts (Atom)